VIDEO & SOUND PRODUCTION // PROJECT 1
4/4/2023 - // Week 1 - Week 14
Hasnol Rafiq Bin Hasnol Raduan / 0356767
Information Design / Bachelor of Design (Hons) in Creative Media / Taylor's Design School
Information Design / Bachelor of Design (Hons) in Creative Media / Taylor's Design School
INSTRUCTIONS
TASK 1: AUDIO DUBBING

|
| Figure 1 - Freesounds.org |

|
| Figure 2 - Sound Adjusting |
With Adobe Premiere Pro, I can have complete control over all sound aspects. Premiere Pro allows to adjust volume levels, balance audio tracks to help in enhancing the emotional impact and narrative of the videos. Being able to carefully control sound elements is really important if I want to get a professional-quality audio dubbing result.

|
| Figure 3 - Timeline |
When we do audio dubbing, we need to make sure that the sound effects and foley match up perfectly with what we see on the screen. The timeline in Premiere Pro allows to precisely line up sound effects using markers, keyframes, and trimming tools. By zooming in and out of the timeline, you can carefully match every sound effect with the intended visual cue, guaranteeing a smooth blend and a refined end result.

|
| Figure 4 - Exporting |
Figure 5 - Final Audio Dubbing
TASK 2: SOUND SHAPING
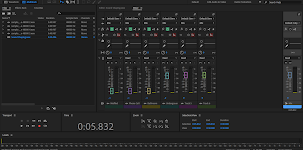
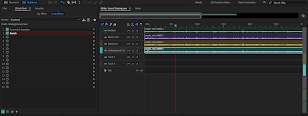
Figure 6 - Adobe Audition
 |
| Figure 7 - Parametric Equalizer (Muffled) |
The parametric equalizer is a truly amazing tool that allows control over specific frequency bands in an audio signal with great precision. To make a muffled sound, I must reduce the clarity and brightness of the audio by suppressing the high-frequency content. First, open Adobe Audition and locate the parametric equalizer. Then, find the frequency range that is responsible for the high frequencies, adjust the cutoff frequency of the low-pass filter. The audio loses its crispness and sounds like it's coming from far away or is muffled.
 |
| Figure 8 - Parametric Equalizer (Phone Call) |
The muffled sound effect is used a lot to imitate a specific environment or make an artistic effect in audio productions. To make a muffled sound, I need figure out which frequency ranges are important for that effect. Typically, the mid and high-frequency ranges get reduced while the lower frequencies are able to pass through with minimal impact. If you focus on certain frequencies, you can imitate the muffling effect and manage the overall tone of the audio.
 |
| Figure 9 - Reverb (Bathroom) |
Using the Parametric Equaliser to copy the way the bathroom sounds, we can make some frequencies louder and some quieter. To recreate the acoustic environment of a bathroom, reverb is an important component. I selected a reverb preset that imitates the qualities of a small room or bathroom. Adjusted the decay time, pre-delay, and wet/dry mix until I got the effect I want. Decreasing the decay time, it will mimic the fast echoes in a tiny area. By modifying the pre-delay, it establishes a feeling of space between the sound origin and the bathroom walls.
 |
| Figure 10 - Reverb (Underground Cave) |
The Parametric Equaliser allows the shaping of the frequency spectrum of the audio and create the loud characteristics. I begin by reducing the higher frequencies to imitate how sound is absorbed by cave walls. Giving the audio a more muted and distant quality will be achieved. To make it sound like we're in a cave, we can increase the bass and highlight the echoey sounds. Reverb is really important when trying to make it sound like you're in a cave. To achieve the desired effect, one can experiment with decay time, pre-delay, and wet/dry mix. Increasing the decay time, it will mimic the longer reverberation that happens in a cave. By changing the pre-delay, it seems like the sound is coming from far away inside the cave.
Final Sound Shaping:

Comments
Post a Comment